
RULE BOOK
This is what a basic setup of the game looks like. The rule will take you through each step for setup then playing the game.
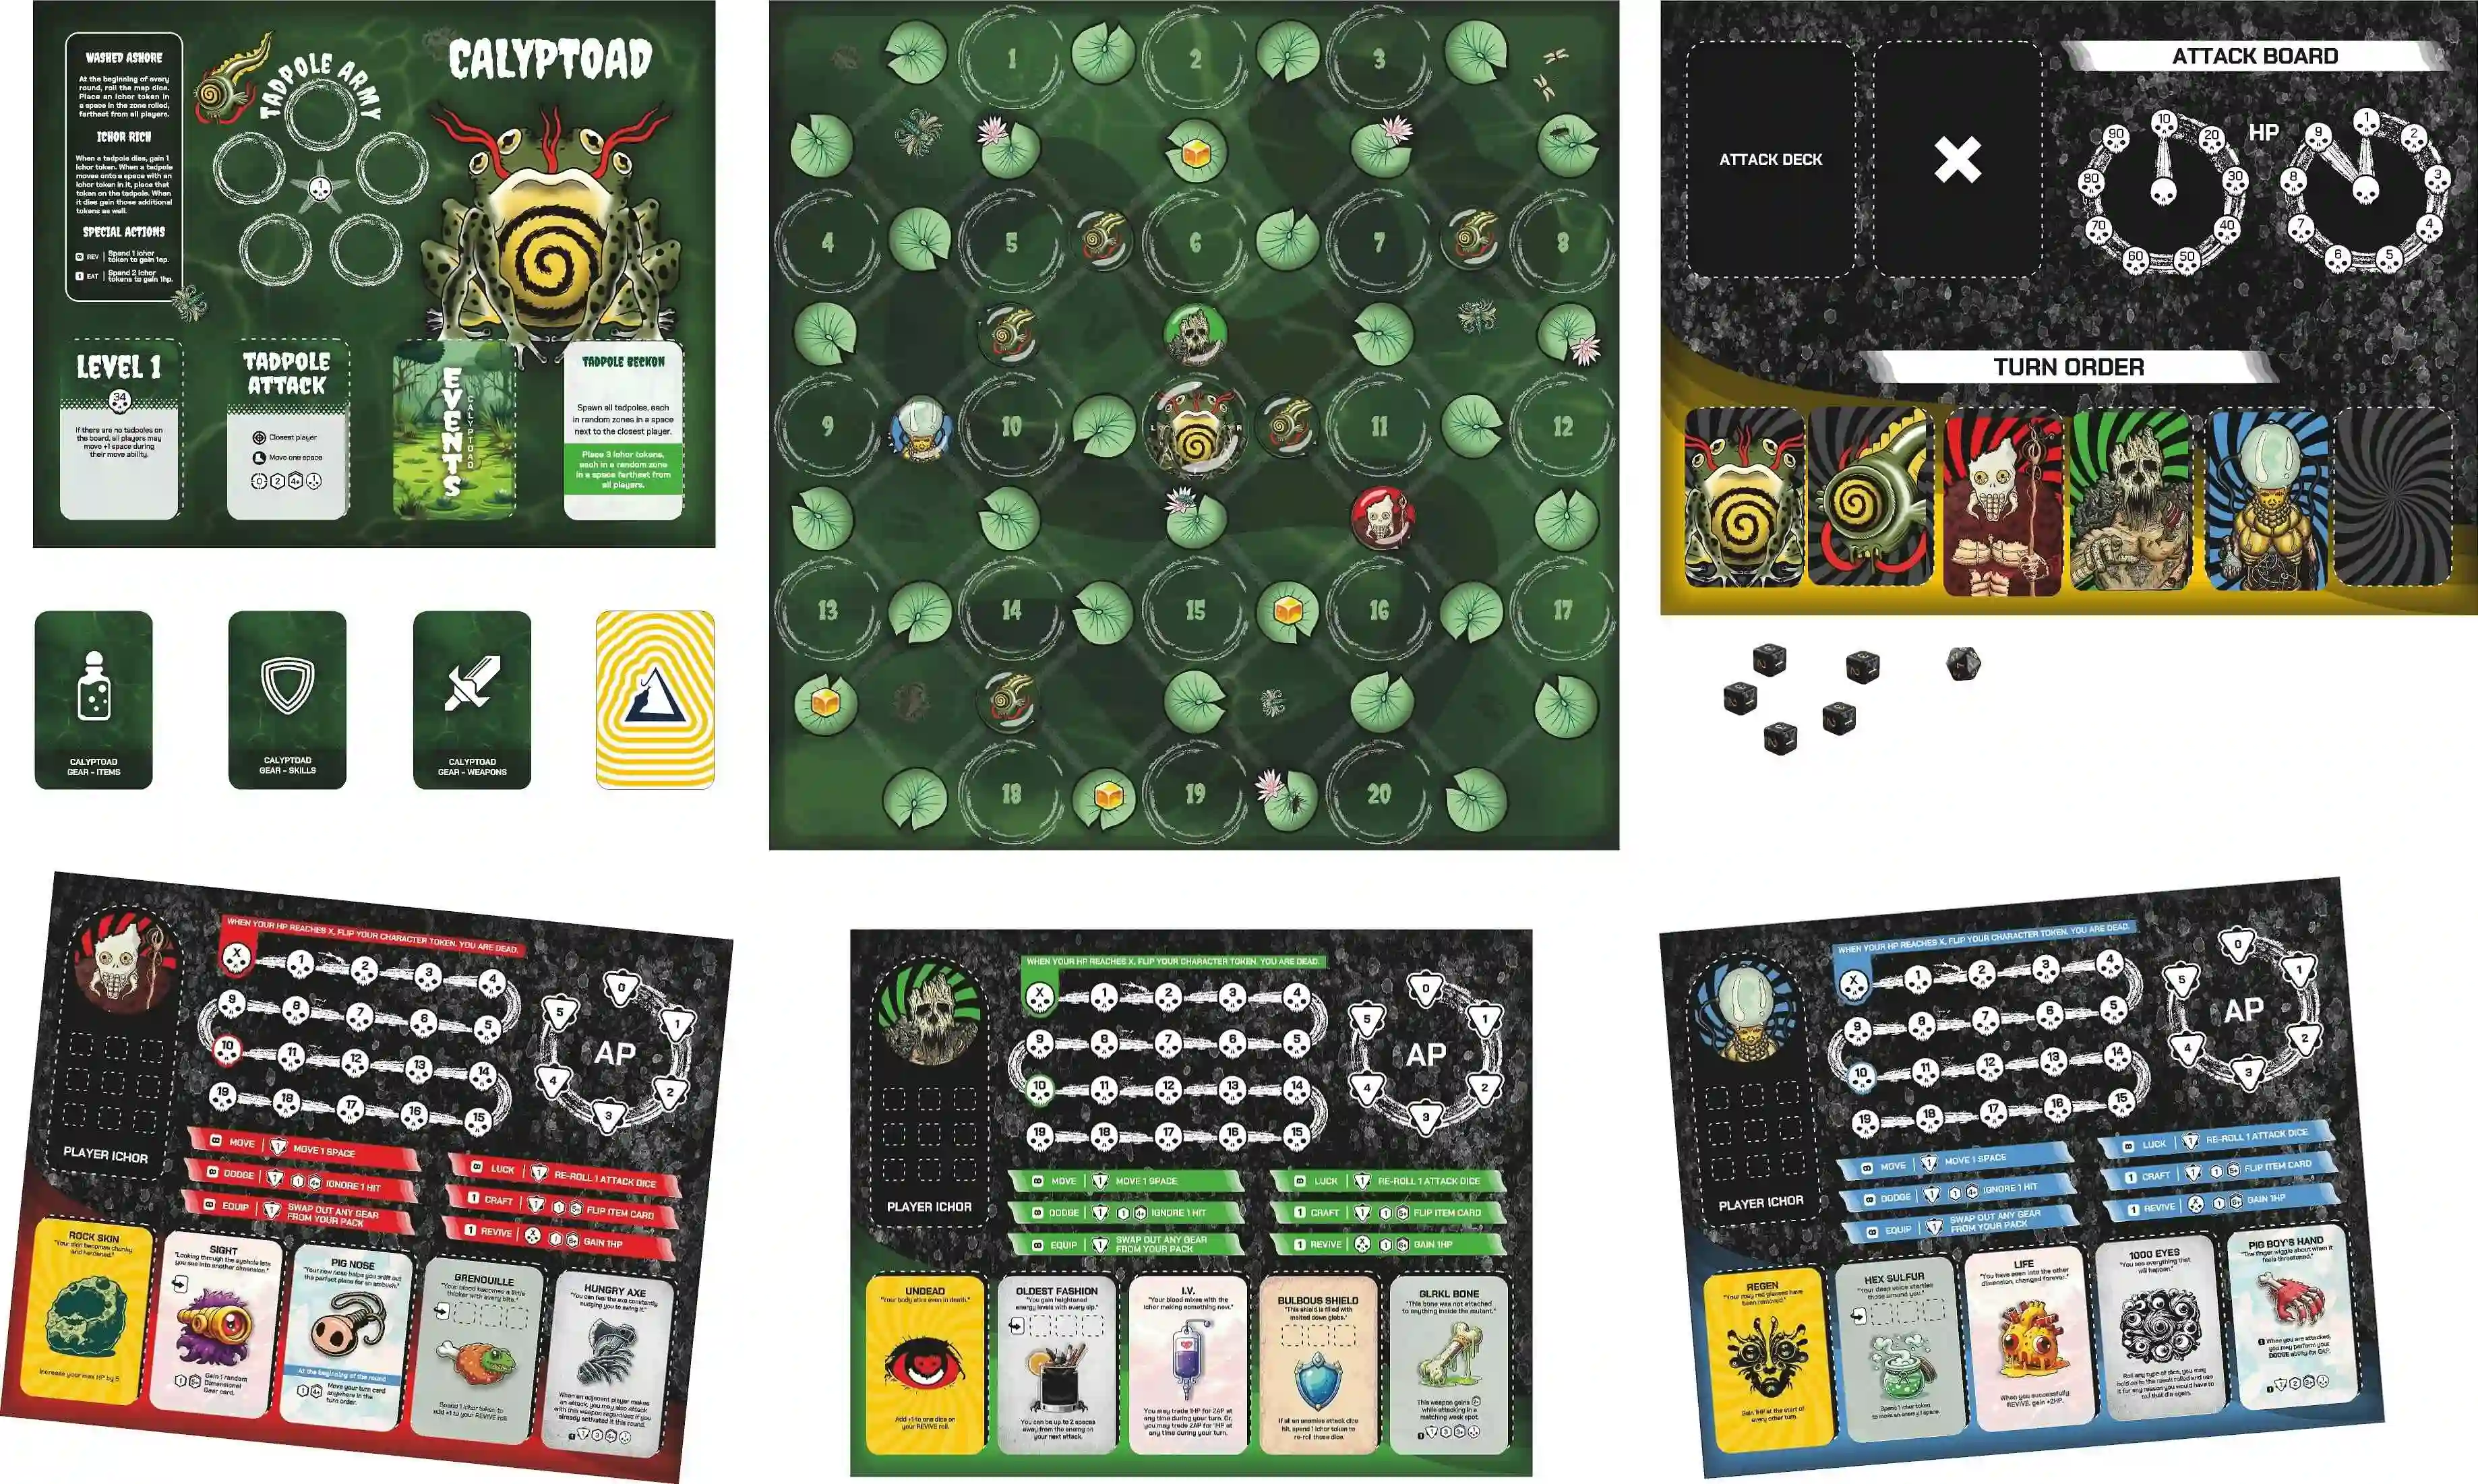
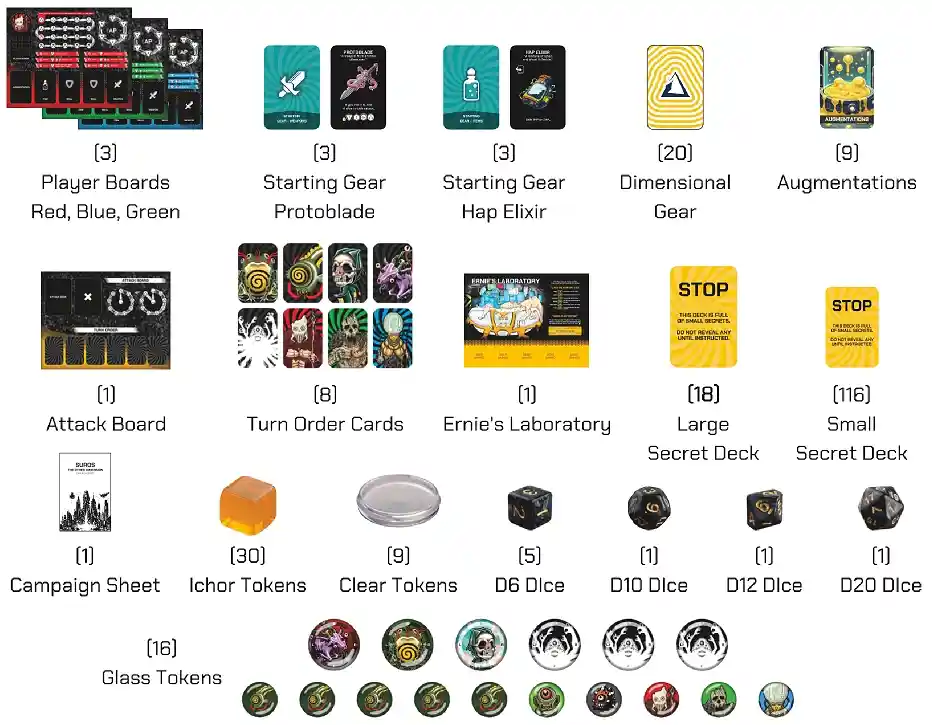
Listed below is everything included with your game. List of components for specific Mutant bosses can be found in the back of the book starting on page 21. Some boards are double sided so be sure to check the back when searching for a specific component.
There are secret cards that hold all the unlockable content in the game. Each secret has a a yellow divider card with a letter on the front (ex. C). Please be careful when unwrapping your decks as these cards are in the back of them. Your campaign sheet will instruct you when to unlock these cards. When you are instructed to unlock something, start by finding the the page in the back of this book with the same matching letter. That page will tell you what cards to unlock which will also have the same letter on the divider cards. There are some unlockables that the campaign sheet does not tell you how to unlock and must be discovered yourself, have fun!
GAME START UP
GAIN PLAYER BOARDS
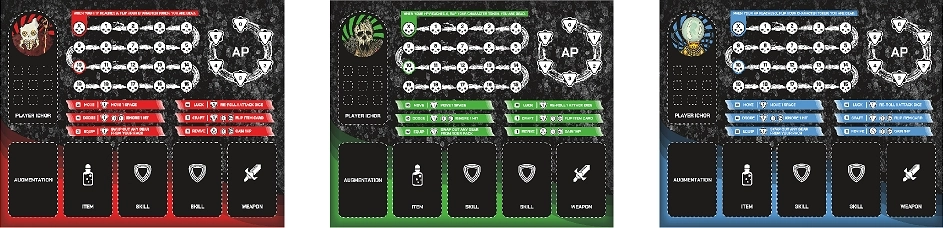
Regardless of player count, you must always include all 3 player boards. Each person gets a PLAYER BOARD and 2 clear tokens. Place one token on 10HP. This is the max HP a player can gain at the start of the game. Place the other token on 3AP. The max AP you can ever have or gain is 5. These boards are color coded to help keep track of various game mechanics.
GAIN STARTING GEAR
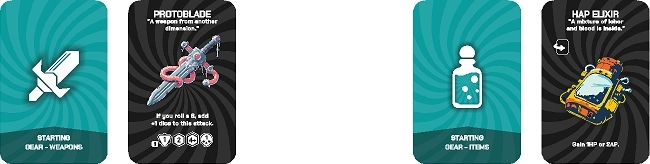
Each player gains GEAR (one starting weapon and one starting item). The only gear available to you on your first game is the HAP ELIXIR ITEM and the PROTOBLADE WEAPON. Place these face up on the matching spaces on your player boards. Players may gain access to new starting weapons during their game. When these are gained, permanently add those to your game box for future campaigns. A player may never equip more than one starting weapon and Item.
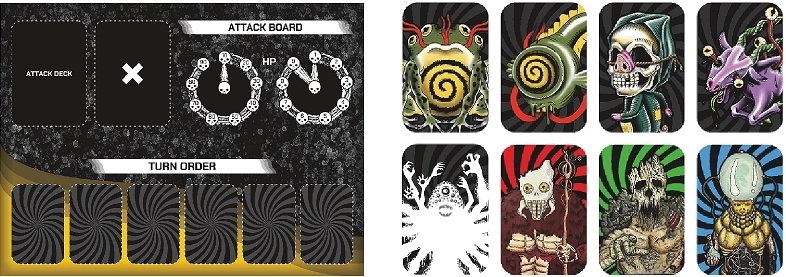
SETUP THE ATTACK BOARD
Place the ATTACK BOARD in the middle of the play area. Each player and enemy has a TURN ORDER CARD with a picture that matches the character on their player board. Set these cards next to the turn order line on the board. Place two clear markers next to the HP track. The HP will be set depending on the mutant you are facings level card.
CHOOSE A MUTANT TO BATTLE
There are 4 mutants to choose from in this box. If this is your first time playing the game, it is recommended you battle GERFLUX first. How to setup a boss can be found starting on page 21 of the rule book. Take out all the matching mutant cards of the box shown in the setup guide. During setup you will be instructed to add different level cards to decks. If a card has no level marked on it, then it will always be added to the deck for the battle. If you are battling a level 2 boss, you will add cards with no level listed and all level 2 cards. If you are battling a level 3, add all level 2 and level 3 cards to the deck as well.

GAIN A CAMPAIGN
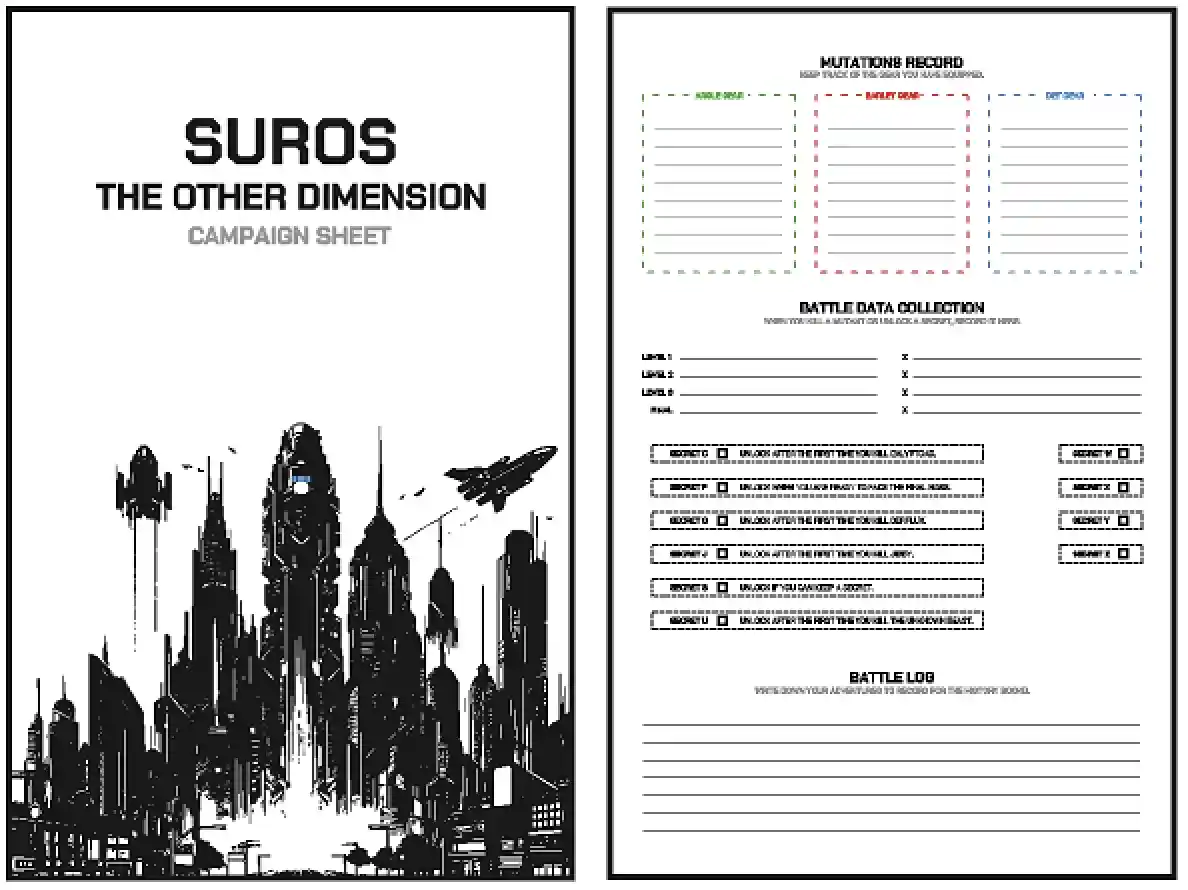
This game features a 4 session campaign. On this sheet you can record your games keeping track of what mutant's you have battled, the gear you have gained and secrets unlocked. If you plan on playing over multiple days this handy sheet will help keep you organized. You can print more of these sheets from the link below.
GAIN HP
HP is depicted as a skull with a number inside. When you see this symbol, you know that a player or enemy is going to lose that amount of HP from an attack. You keep track of health using clear glass tokens placed over the numbers on the HP track. When your HP reaches the last skull marked by an X, flip your token, you are dead. Players start with 10HP when a new game is started which is highlighted on your player board. Your HP cannot exceed 10HP unless a card allows you. If you gain a card with an HP value, adding that to your base 0HP would be your new max HP that again, cannot be exceeded.
GAIN AP
AP is what players use to perform abilities or special actions during events or other card mechanics. The symbol indicates when something will cost AP and the number tells you how much AP it will cost. Players begin the game with 3AP and do not gain any on their first turn. At the beginning of a player turn after their first, gain 3 AP.
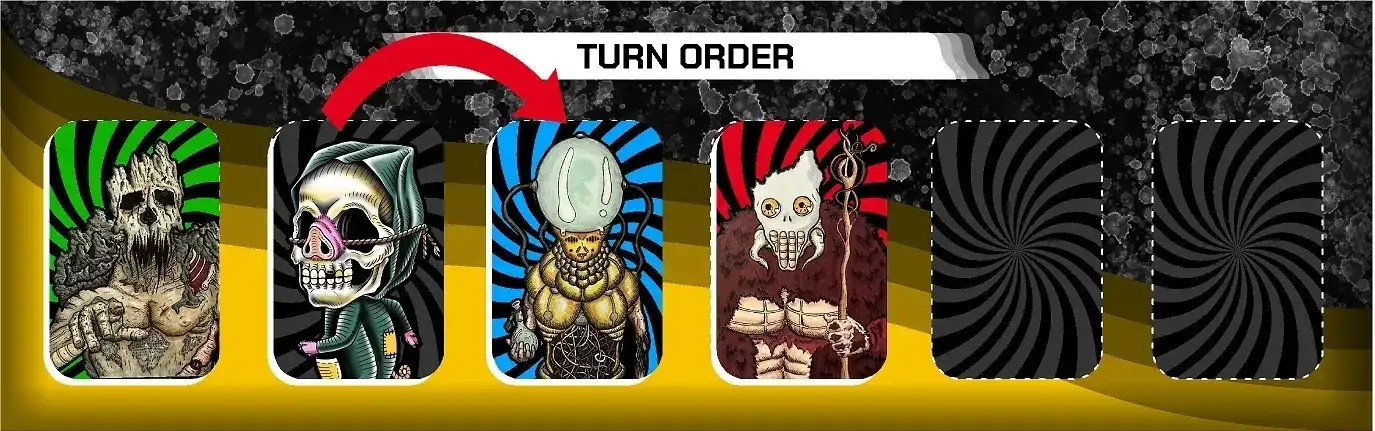
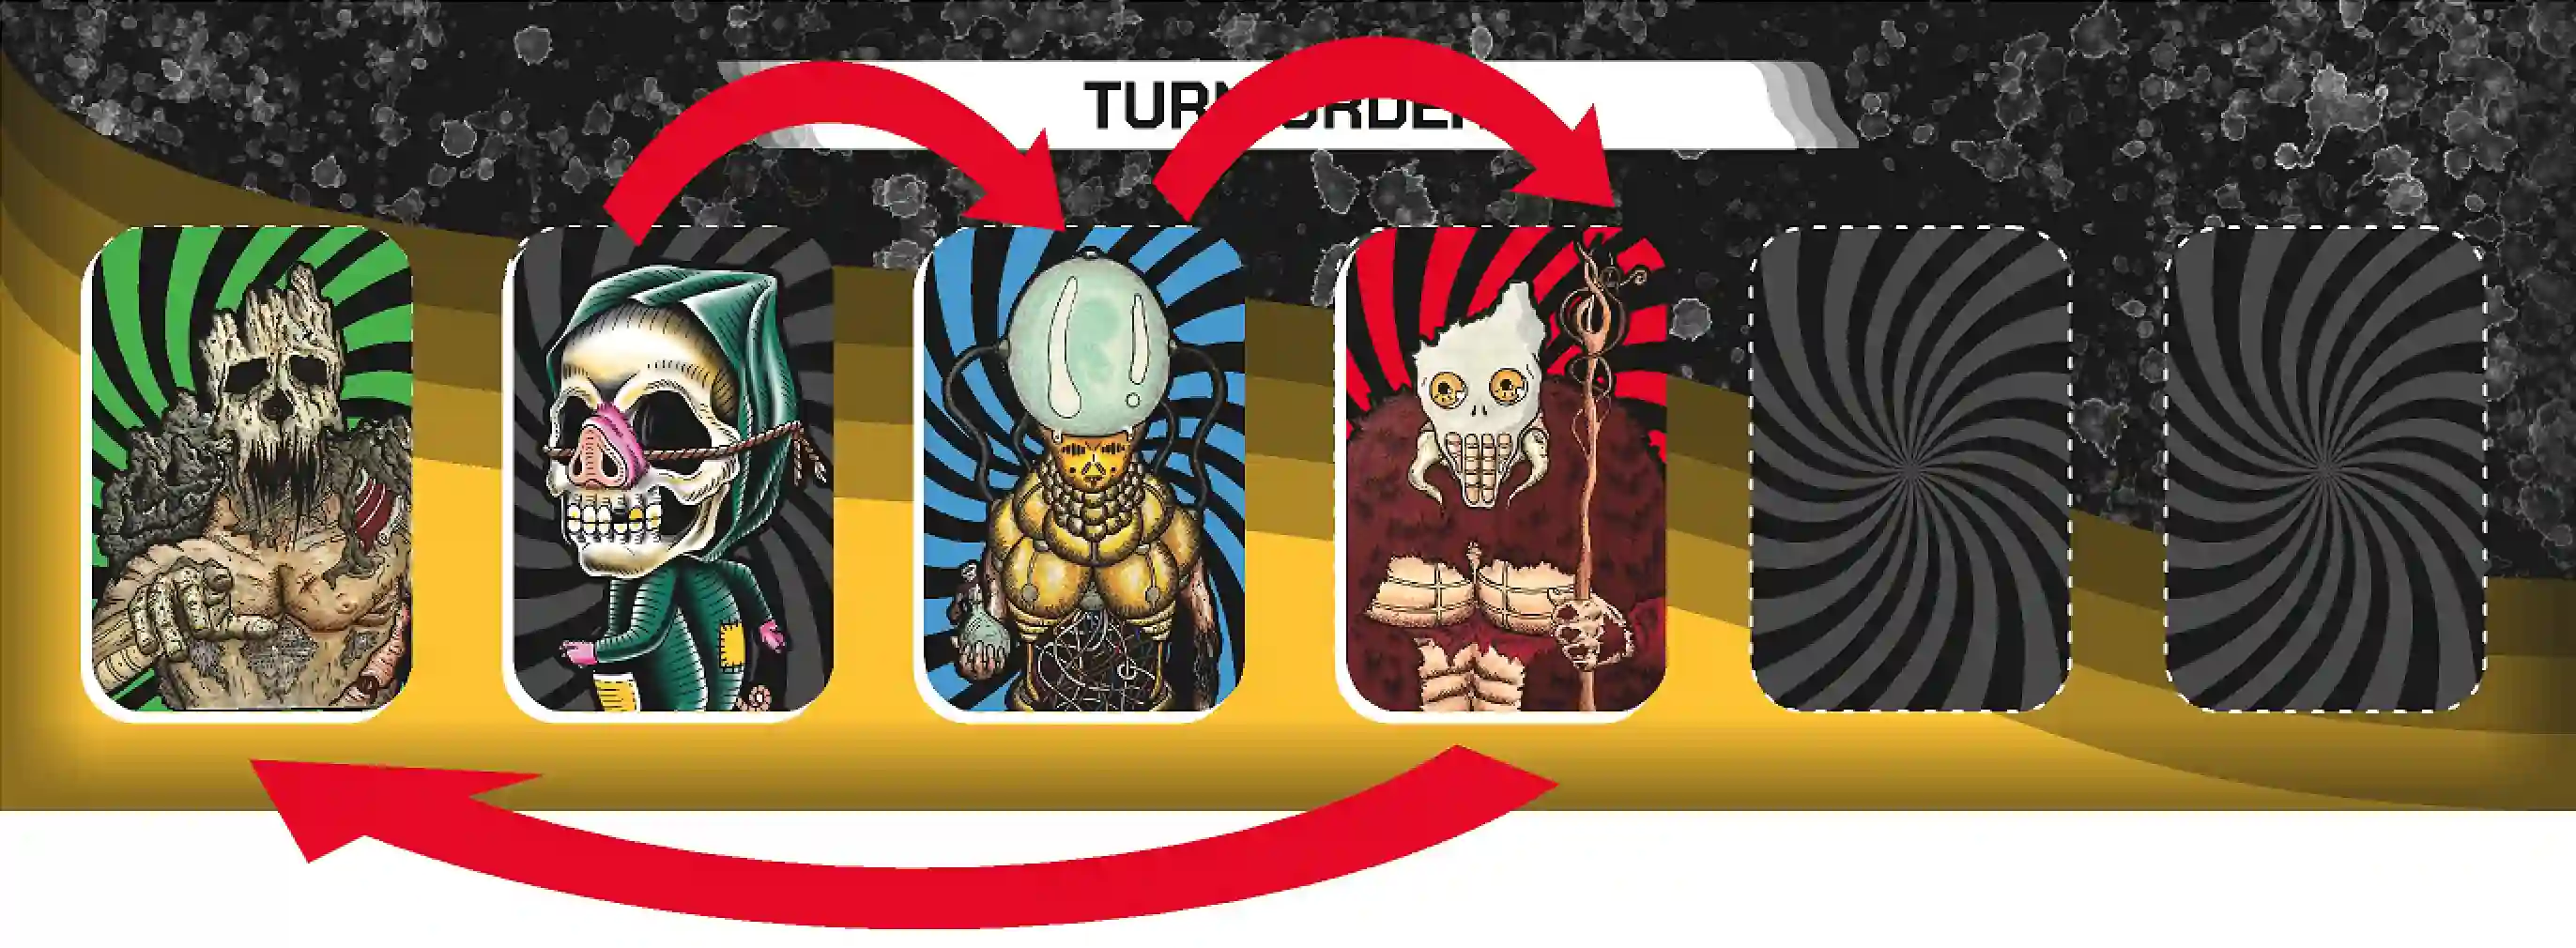
TURNS & ROUNDS
Each player and enemy gets one turn in a round. Turn are is determined by the TURN ORDER DECK. This deck has a card for each player and one for the enemy. picture on it and one of the enemies you are fighting. At the beginning of every round, draw an event card then shuffle the turn order deck and lay them out on the turn order track one by one. This track determines when a player or enemy may activate. A round ends after all players and enemies have taken a turn.
THE ATTACK BOARD
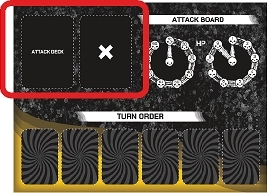
The attack board is used for all battles. During setup, place the mutant you are battling attack deck on the attack board. The attack deck has a discard section represented by an X. A mutant's HP is tracked on the right hand side of this board with clear tokens. Mutant Level cards will tell you what to set the HP to. You will learn more about making an attack in the ATTACKING section of the rule book.
TURN ORDER TRACK
The turn order track is located on the bottom of the attack board. After the event card is played, character cards and enemy cards will be shuffled and laid out on this track. One by one, after a player or enemy ends their turn, flip their turn card face down to show that they are done. This determines what initiative each player and enemy will have their turn. After all players and enemies have had their turn, the round ends. When an enemy is choosing a target and their is a tie, the turn order will be used as the tie- breaker. The player to the right of the attacking enemy will be the target. If that player cannot be target, you will move on to the next character card until a target is found.
TAKING YOUR TURN
Based on the turn order track, players take turns from left to right. When a player or enemy's turn is over, flip their card face down. At the beginning of a player's turn, they gain 3AP. A player does this at the start of every turn except the very first turn, because each player starts with 3AP.
CLEAR TOKENS

Clear tokens are used to keep track of player/enemy HP and AP. Place these tokens directly over the space you are marking so the info beneath it can been seen clearly through the token.
THE MAP
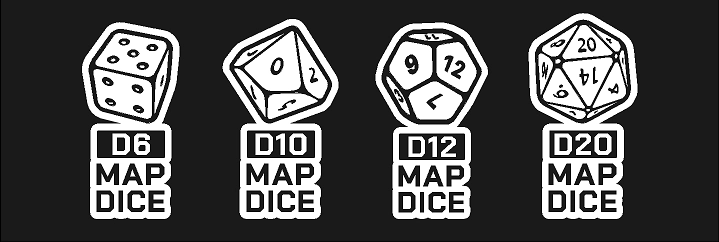
Each mutant comes with their own unique map where the battle takes place. Maps include a MAP DICE that has the same number of sides as the number of zones on that map. When an event, card or rule instructs you to move or do anything in a "random zone", take the map dice and roll it to determine the zone that is being targeted.
ZONES
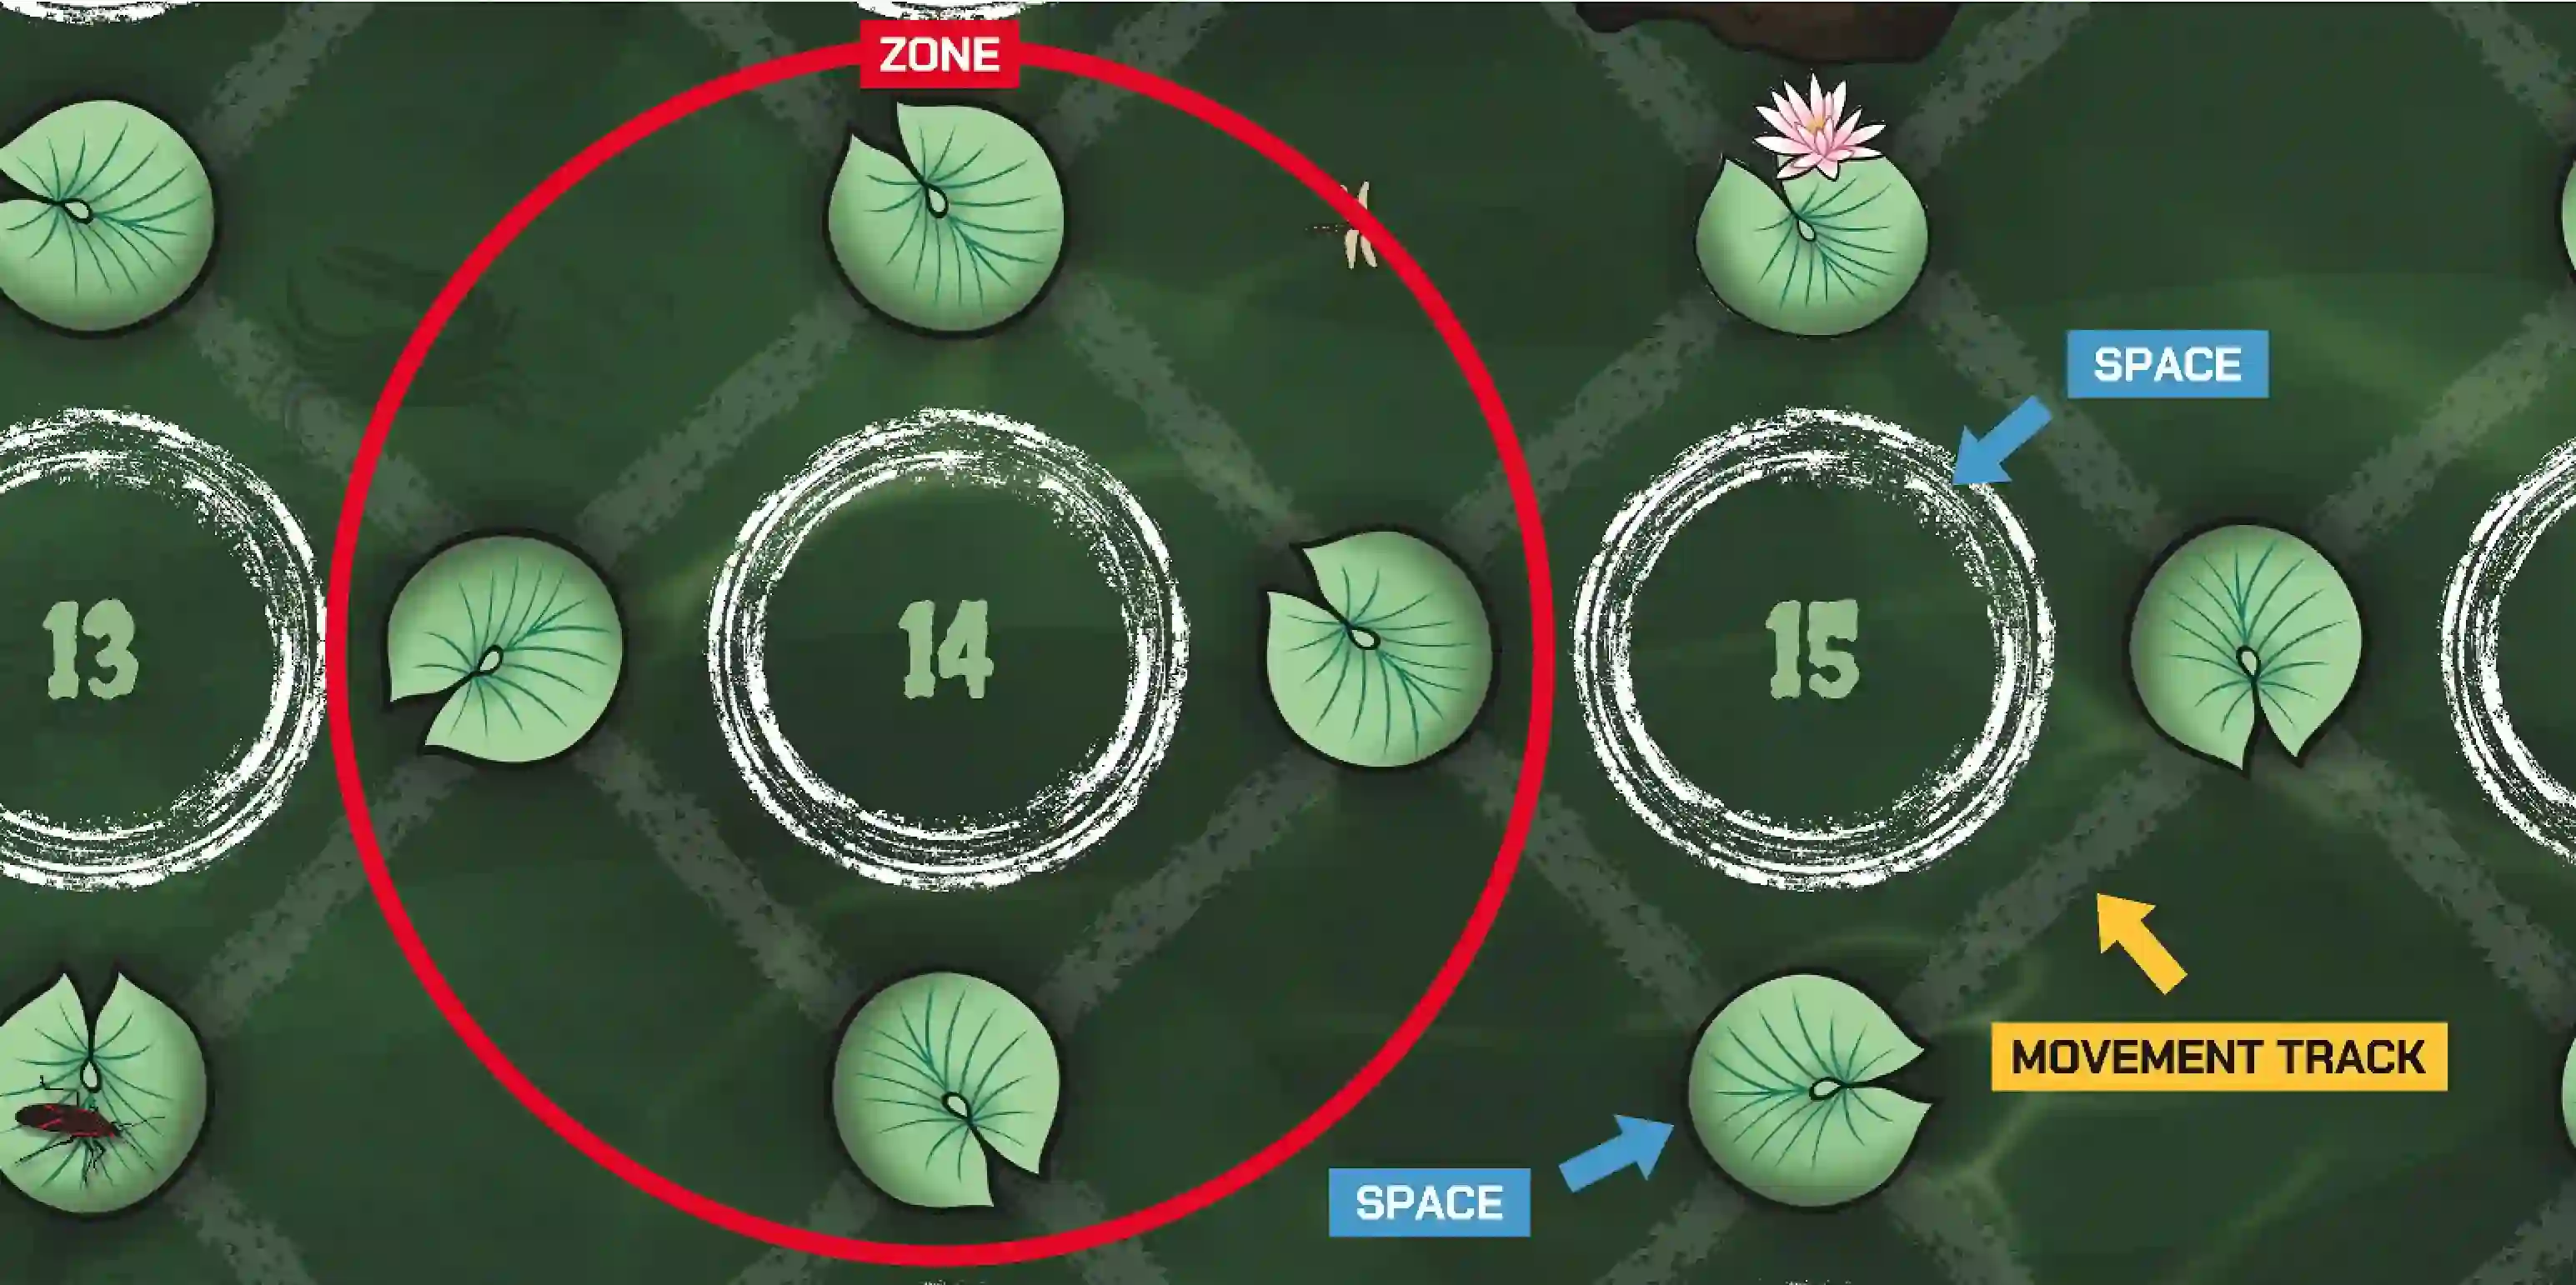
Zone are combinations of spaces adjacent to each other. Zones will have a larger center space where only a mutant can occupy with smaller surrounding spaces where players and other enemies can move through. The center space will have a number on it indicating what zone that is. It is possible to be standing in multiple zones at once as a space can be adjacent to multiple spaces with a zone number in it. If a card affects your zone but you are standing in multiple zones, you are still affected by it. You cannot choose to be standing in one zone or the other.
SPACES
Spaces are special spots on a map that an enemy or player can move through. Spaces are sized to fit different sized mutants and players. A player can never move into a space that is not the same size as their player token and an enemy can never move into a space that is not the same size as their enemy token.
MOVEMENT TRACK
There is a faint track that flows throughout an entire map. This track will show all spaces a player can move to. You can never break the flow of the movement track such as moving from one side of a zone to the opposite side. Mutants do not follow the rules of the movement track, but minion enemies do the same as players.
ADJACENCY
A card may say you must be "adjacent" to do something. Adjacency is determined if two spaces are directly next to each other in a zone. To determine this, a player must be one space away from an enemy or player and be in the same zone. These spaces must also be connected by the movement track. Large spaces are always adjacent to a smaller space in the same zone.
THE MAP DICE
Every map comes with a map dice. If a card says to attack a random zone, move to a random zone or an event effects a random zone, you will roll the map dice to determine the the zone. Each mutant's setup will tell you what dice to use for that battle. If there are more numbers on a dice than there are zones, rolling that number allows a player to decide what zone is affected. Ex. Jibby's map only has 9 zones. If anyone rolls a 0 using the D10, the players get to decide.
SPECIAL RULES & ACTIONS
Maps may have special rules written on them. Any rules on the map will be detailed in the mutant's setup guide in the back of the book starting on page 21. These special rules and actions can only be used while battling that mutant.
MOVEMENT
SPECIAL RULES & ACTIONS
Players and enemies move differently. Players must use AP to make moves where enemies movement will be listed on an attack card.
PLAYER MOVEMENT
The players uses ACTION POINTS, or AP to move spaces on the map. Player boards show AP in the top right. Players use a glass token to keep track of their current AP available. The map will have two sized circles on them showing the possible places to move to. The smaller circles are for players and minions that can fit in those circles. The larger circles are for mutants to move through. A player or smaller minion may never move into a space that does not fit there token size. The movement track on the board shows the possible routes that can be taken by a player. These are faint lines that follow the smaller circles spaces. Players cannot skip spaces if there is no movement track and cannot jump over larger spaces.
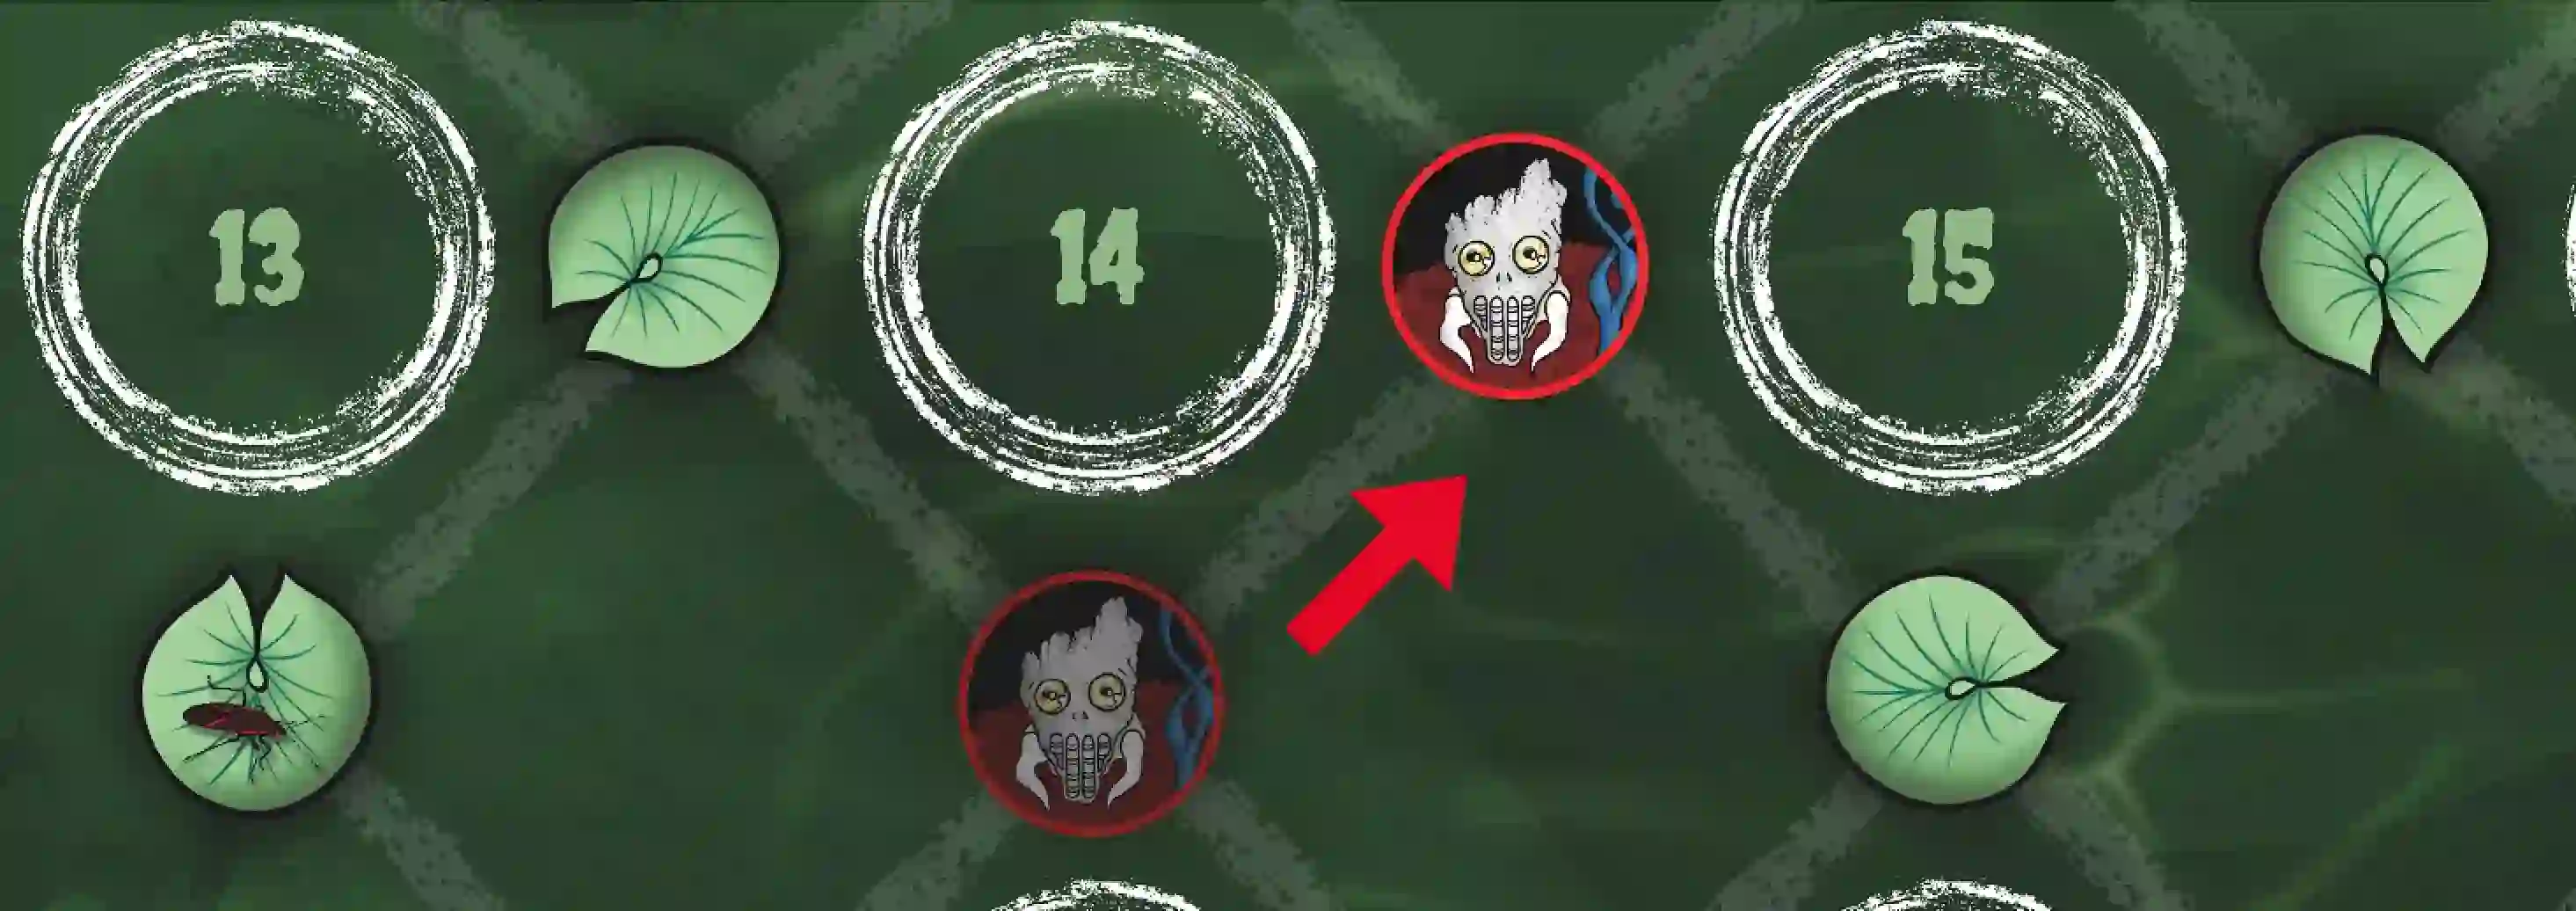
ENEMY MOVEMENT
Mutants have infinite movement. At the beginning of a mutants turn they draw an attack card. The attack card will say where to move the mutant. A mutant may only move in a circle space that fits their token size. These larger spaces will have the zone number on them which are used for various game mechanics. Some enemies are the same size as players and use the smaller circle spaces for movement (Ex. Calyptoad's Tadpole Army). Smaller enemy types are known as minions and have a set movement amount, the spaces they can move will be displayed on a card or mutant board or attack card.
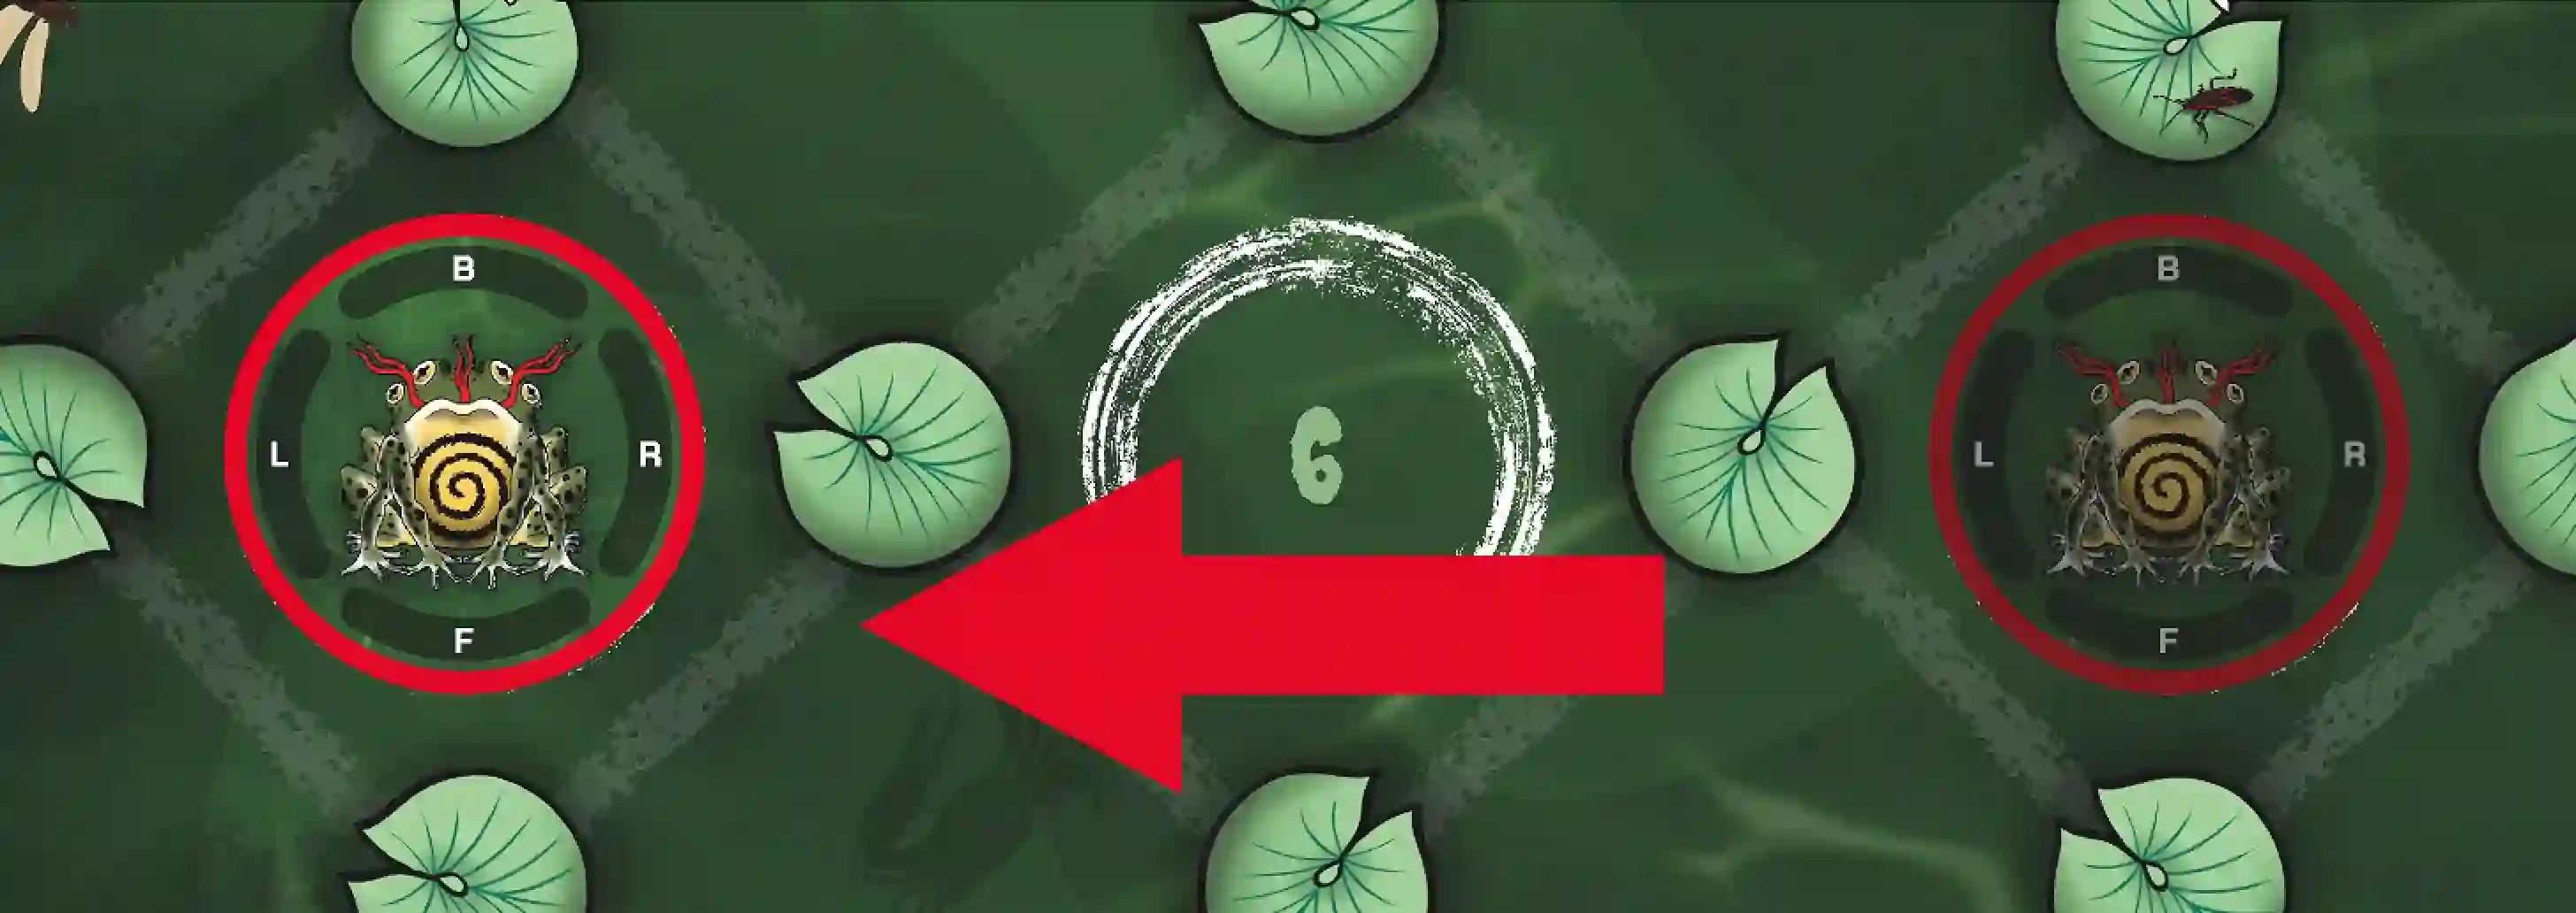
To move the mutant, simply move it to the zone indicated on the attack card. A mutant will move in the straightest line possible to reach it's target. If multiple spaces are available to place a mutant, place them in a space that would be the most advantageous for the mutant. For example, If a card instructs you to move the mutant to range 1 of the target, place them in the zone where no players currently occupy if possible. NEVER rotate the mutants token when making a move. An Icon known as the FACING will tell you how to rotate the mutant. When moving a Minion, move the ones closest to the targeted player first and in a way that would maximize the amount of enemies that could be adjacent to a player.
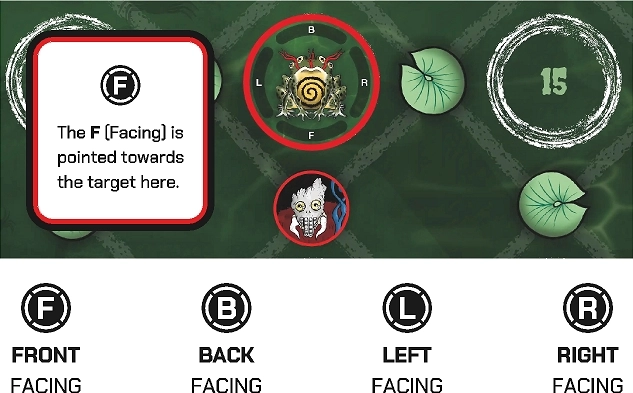
These symbols are what is known as the FACING. after a target has been chosen, rotate the mutant's token so that the matching letter points in the same direction as the target.
For example, if the "F" is shown on the facing symbol, you will rotate the mutant's token so that the "F" on that token is lined up with the targeted player. If the attack card does not show the facing symbol, do not rotate the mutant.
MOVING THROUGH ENEMIES VS. PLAYERS
Any player can freely move through another player but cannot end their movement on the same space as another player. A player can never move through an enemy. Enemies can move through another enemy but cannot end their movement on the same space as another enemy. A player or enemy cannot end their movement on top of a DEAD player, but both may move through them. The dead player occupies that space on the map until they are
revived.
DRAWING ATTACK CARDS
A mutant is the main boss you are fighting. They will have their own attack cards, events, tokens and more. Sometimes a mutant is accompanied by smaller enemies called minions. these can be referred to by different names such as Calyptoad's tadpole army. An enemy can be a mutant or a minion for rule reference.
ON A MUTANT'S TURN
At the beginning of a mutants turn you will draw a mutant attack card. Attack cards will tell you exactly what the mutant will do for the round as you read from the top of the card and make your way down one line at a time. Once you are done with an attack card the mutants turn is complete. Place that card near the mutant as it will be used to reference the Weak Spot for the remainder of the round. When the round is over, place that card in the discard pile.
ON A MINION'S TURN
At the beginning of a minion's turn you will draw a minion attack card. Minions only have one attack card which is placed on the mutant board. This card may change depending on what level mutant your are currently facing. Move each minion based off the targets location. Once all minions have been moved you then roll attack dice for each one that can attack a target that is in range (usually adjacent).
ENEMY ATTACK CHOICES
At the beginning of a minion's turn you will draw a minion attack card. Minions only have one attack card which is placed on the mutant board. This card may change depending on what level mutant your are currently facing. Move each minion based off the targets location. Once all minions have been moved you then roll attack dice for each one that can attack a target that is in range (usually adjacent).
MUTANT ATTACK CARDS
Mutant attack cards all follow the same flow. Start reading at the top of the card and work your way down it in order. If done correctly you will have a very easy experience controlling the enemies AI. Below shows an example of how to read an attack card.

Name of the attack - PRONK
1. Target a random player. (each player rolls 1D6 to determine, lowest roll is the target).
2. Move the mutant to be at range 0 of the target (Same zone as target).
3. Rotate the mutant token so that the F on the mutant token points at the player.
- Now you will begin the attack.
4. Determine if the player is within range for the attack (Range 0).
5. Roll two D6 attack dice. (Let's say the attack rolls were a 3 and 4).
6. Determine if rolls were a hit. (In this example, one hit was successful!)
7. Determine the damage per hit. (-1HP for each hit).
8. Tell all players where the weak spot(s) are for the round (Red player gains +1 attack
dice if adjacent to the mutant and standing in the BACK FACING).
9. The event icon says to move Gerflux to zone 5 (do not rotate the mutant).

TARGET - The target of this attack.

MOVE - What range the mutant moves to based off of the targets locations.

FACING - What direction the mutant faces based off of the target.

ATTACK RANGE - How many zones away from the attacker this attack can reach. 0 means the target must be in the same zone. 1 would mean one zone away from the attacker, etc.
D6 ATTACK DICE - This symbol represents a D6 (6 sided dice) the number inside tells you how many dice are rolled for this attack.
D6 SUCCESSFUL HITS - This symbol represents what numbers on the D6 rolled equal a HIT. When a hit is successful this means losing HP will apply.
HEALTH POINTS - How much HP is lost for each successful hit.

WEAK SPOTS - This shows the mutant's current WEAK SPOT for the round. If a player is adjacent to the mutant and the weak spot on the card is the same color as the players board, the player will roll +1 attack dice during their attack. The weak spots stay in effect until a new attack card is drawn or the round ends. For PRONK, if the red player is standing in the BACK facing of the mutant, they will gain the attack bonus.
EVENT SYMBOLS mean something special will happen. They will always tell you exactly what to do when they come up. If an event says to SUFFER PUSH, move the player away from the attacking mutant in the opposite direction. If a player cannot move, they do not suffer push.
PLAYER ATTACK CARDS
Players are limited in how many actions they can use in a round. The amount of options are based off the amount of AP they have on their player boards. Players can spend these points to activate anything that has the AP symbol on it, mainly for attacking and making moves. Below shows an example of how to read a weapon gear card.

ACTIVATION LIMIT - How many times this action can be performed in a single round.

ACTION POINTS - The AP cost you must spend from your player board to use this action.
D6 - This symbol represents a D6 (6 sided dice) The number tells you how many dice are rolled for this attack.

D6 RESULTS - This symbol represents what numbers on the D6 rolled equal a HIT. When a hit is successful this means losing HP will apply.

HP LOSS - How much HP an enemy loses for each successful hit.
Gear will often have special abilities that come with it. For example, the PROTOBLADE states that during your attack roll, if any of the dice show a 6, you may add another dice to that attack. These abilities only ever work when using that weapon. Some cards may have limits to how many times an ability can be used in a round. PROTOBLADE has no limit, making it a very fun weapon to use as long as you are rolling 6's! Other cards will have text stating limitations, such as "Limit one dice".
GEAR
All gear cards will have listed what type of gear it is with an accompanying symbol. Gear can only be placed in a space with the matching symbol on your player board.
DOUBLE SIDED CARDS
Double sided cards leave for limited room to display the type of gear it is. So at the top will be the gear symbol it is associated with and at the bottom is listed the type of gear it is. When starting a battle, a double sided gear card must begin on the side that has gear type listed at the bottom. All double sided gear cards are secrets and must be unlocked by killing mutants or solving puzzles.
EQUIPPING GEAR / PACK
All gear cards have the keyword GEAR listed on the back of them. Gear comes in three types (Items, Skills, Weapons). A player can hold any amount of gear
cards by stacking like gear types on top of each other. Any gear that is currently not on the top of that deck is considered in your PACK. Only the card on top of the stack is active. On your turn you can spend AP to swap out any gear card from your pack. This is explained in more detail in the PLAYER BOARD section.
SPECIAL GEAR SYMBOLS

Many gear cards have dashed outline of boxes on them. When a card has these icons on them, a player will fill all boxes at the beginning of the battle with yellow cube tokens referred to as Ichor tokens. These give gear a limited times it can be used.

This symbols will be listed on many gear cards. This symbol means when a card is used, after completing the affect or ability of the card, it must be flipped over. The card can no longer be used again. If this symbol is on a card with Ichor tokens on it, the card is not flipped until all tokens have been used.
SKILL CARDS
Players can have up to two active skills. Skills can do a number of things such as manipulating dice, giving out free movement or even making exceptions to rules. If a skill has no AP cost, You may perform that skill for free. The blue bar
indicates this card has a limit. For example, the ability on Foot Charm may only ever affect one dice. Skills can give the player special abilities, new attack options and much more!
ITEM CARDS
Items cards have their own rule to follow. Items are considered to be a consumable, which means they are limited in the amount of times they can be used. All items have the symbol to flip the card over once it is used. Items are often very powerful and can change the outcome of a battle if used at the right time. Below is a detailed explanation of how an item card is used.
1. Spend 1 Ichor token to move 1 space. The Toadsicle has the special gear symbol on the right that indicates to fill all the boxes with Ichor tokens. When all Ichor tokens have been used on a gear card, the gear is considered used and then the card is flipped. If there are no boxes shown on a card, it is flipped immediately after it is used.
2. FLIPPING A CARD BACK TO FACE UP.
Players have an action on their player board that allows them to flip their used Item card face up. When this happens, treat the card as if it is new again and fill all boxes with Ichor tokens, ready to be used again in battle. This will be explained more in the PLAYER BOARDS section.
3. Flavor text will often accompany a card that gives you a bit of lore or context about the card or the mutant you gained it from, neat!
GAINING ICHOR TOKENS
Some gear will say to gain Ichor tokens. When a gear card says to gain Ichor tokens, those
can only ever be placed on the gear card that says to do it. Ichor can only be spent on the
gear card it is on. You cannot move Ichor tokens from one gear card to another. Your
character can also gain Ichor tokens which can never be transferred or used for any gear
cards. If a card other than a gear card says to gain an Ichor token, you place that token on
your character space on your player board.
DIMENSIONAL GEAR
Dimensional gear are unique cards that can only be gained through specific circumstances in the game. Dimensional gear is much stronger than regular gear. When a card instructs you to gain a dimensional gear card, shuffle the dimensional deck and draw one at random. When you gain a dimensional card during battle, you may equip it immediately. These cards have a weapon, skill or item icon at the top of the card.
EVENT CARDS
At the beginning of every round, draw an event card. Events are fun and unique scenarios that will give you decisions to make, helpful boons and disadvantages for the players. Events keep the game fresh and create diversity in your games. All mutants event cards are unique to them and follow different rules and give the players new ways to play.
EVENT CARD EXAMPLE
To play an event, simply start at the top of the card and work your way down, reading until it is complete. Below shows an example of how to read an event card to completion.
Events and sometimes other card types will say to roll a D6 (6 sided dice). below that is a series of outcomes that can happen based on the number rolled.
The top of the card shows the name of this card, WHITE EYE LASERS. Below that is a rule that is applied for this event, CHOOSE A PLAYER. In this case, choosing who is affected by this card is not random, the players themselves get to choose who must face the consequences. After a player is chosen, you work your way down the card one step at a time.

This symbol represents a D6 (6 sided dice) The number tells you how many dice are rolled for this event.
1. If the dice rolled is a 1, skip your turn.
2 - 5. The chosen player loses 1HP.
6. Gain 1 Dimensional Gear card.
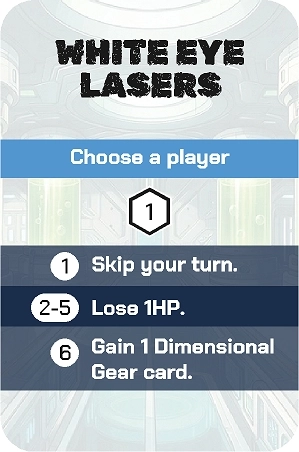
Now that the event card has been completed it is placed in the event discard pile. After an event, the turn order cards are shuffled and placed out for player and enemies to take their turns.
SETTING UP EVENT CARDS
Each mutant comes with its own event deck. The back of a mutants board will show what deck to use for the battle. If the event deck ever runs out during the battle, take all of the event cards and shuffle them creating a new deck.
PLAYER ACTIONS

MOVE - This ability can be performed an infinite amount of times. Spend 1AP to move to an adjacent space. This space must follow the rules of the maps movement track.

DODGE - This ability can be performed an infinite amount of times. This ability is unique in that you can perform this when it is NOT your turn. after an enemy rolls attack dice, before damage is applied, you may spend any amount of AP you have available to roll that amount of dice. On a result of 4, 5 or 6 you must remove one of the enemy's attack dice for each success you have.

LUCK - This ability can be performed an infinite amount of times. This ability can only be performed once per round. After a player rolls their attack dice, they can spend 1AP and re-roll one dice.

CRAFT - This ability can only be performed once per round. Spend 1AP and roll one D6. On a result of 5 or 6, flip your item card over to the usable side.

REVIVE - This ability can only be performed once per round. When a player runs out of HP they flip their player token over to the DEAD side. On that players turn they do not gain any AP. Instead, they may attempt to REVIVE on their turn. Roll one dice and on a result of 6, flip your player token, gain 1HP, 3AP and continue your turn. Rolling a 6 can be tough, but this keeps dead players hopeful of getting back in the game! A dead player will often take over the control of a mutant so everyone can keep having fun!

EQUIP - The equip action will allow you to move any cards from your pack to the front, making it the new active card. Item cards maintain the side they are flipped to.
ICHOR TOKENS

Ichor is a mysterious substance that has shown up and are used in differen ways for each mutant. They are also used in different ways on a players board. Ichor tokens on a players gear card can only be used for that gear card. Picking up Ichor from the map will have you place them on your character in the top left corner. If an attack or event tells a player to lose Ichor tokens, they cannot remove tokens from a gear card, they must be remove or add to a players character space on their player board. If a gear card shows any dashed box icons on them, place these tokens on those boxes until all boxes are filled.
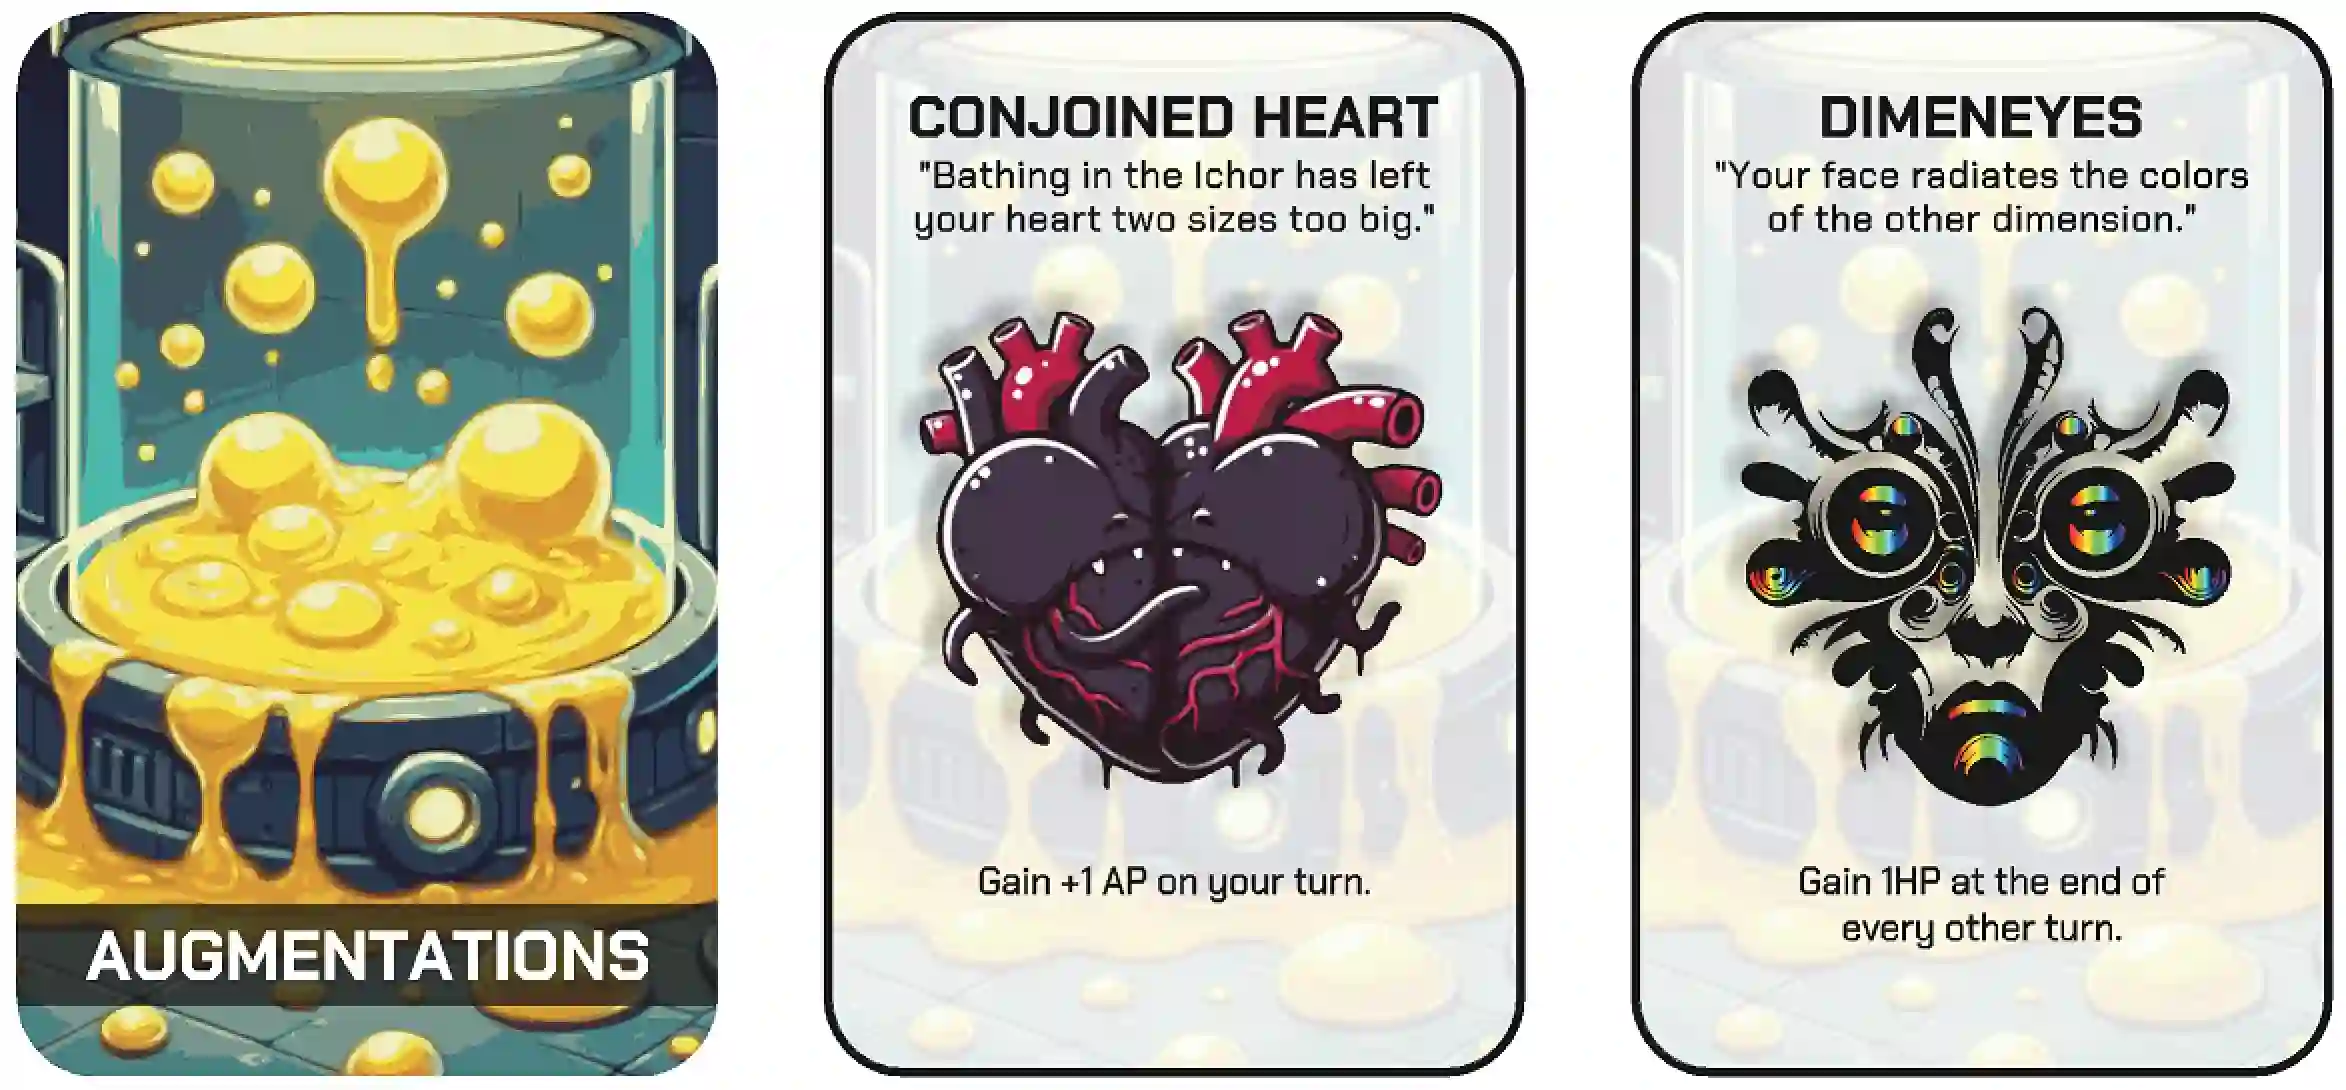
AUGMENTATIONS
Augmentations are buffs the player can gain after the battle. Augmentations are not GEAR and therefore cannot be switched out during battle. When a player gains an augmentation, they cannot trade or give that card to another player. The player will have this augmentation for the remainder of the campaign.
KILLING A MUTANT
When a mutant has been killed, The player gain 7 MUTANT PARTS (MP) collectively. There is no tokens or cards to represent mutant parts. Players will spend these seven resources at Ernie's Laboratory to gain new gear.
The players will begin the game by battling a level 1 Mutant boss. When that enemy has been killed the players must then choose a different boss at level 2, then level 3. You cannot battle the same boss if it has already been killed.
Mutants parts are what the players take back with them to research and create new weapons, skills, items and gain new mutations. Ernie's interest in the Ichor has caused him some odd mutations, nevertheless he helps the players in crafting new gear to further Ichor research.
ERNIE'S LABORATORY
After every battle the players will head to Ernie's Laboratory to do various things with the resources you gained from killing a mutant. Mutant parts (MP) have no card or token to represent them. This is simply a number that must be spent in between battles. Any mutant parts that are not spent in between a battle are lost. At the bottom of this board is some spaces you can layout gear you have created for everyone to see and choose. On the right hand side is where you decide on how to use your MP via lab actions. Players will use their seven MP they gained after killing a mutant and spend them according to the cost of the action. When all MP has been spent there it nothing left to do here and so you must once again choose a new mutant boss to battle. Below is an example of how to spend these resources and an option to have shorter campaigns.

LAB ACTIONS
1. Name of the action.
2. Mutant Parts (MP) you need to spend to do the action.
3. What you gain for paying the cost.
The gear you gain can be placed at the bottom of the board for
all player to see and choose what best works for their player.
FASTER GAME OPTION
If you are returning to the game later and want to fight harder mutants or simply interested in a shorter campaign experience, Ernie can fast track your progression. Ernie's time machine will allow you to auto win mutant fights and gain the rewards. Gaining Dimensional gear is random in this game so a luck of the dice mechanic is added here to randomize your chances of gaining them.
LOSING A BATTLE
If all players are dead in battle, you lose. The battle can be reset and tried again. At this point, before battle has started, players may equip any other gear cards they have or replace their mutation card if any are available. The battle is then retried until the players kill the mutant.
BEATING THE GAME
• You will start the game fighting a LEVEL 1 mutant.
• Once a level 1 mutant is killed, choose another available mutant at LEVEL 2.
• Once the level 2 mutant is killed, choose another mutant at LEVEL 3.
You cannot fight the same mutant multiple times in a game. Each one must be different and a higher level with each battle.
After 3 mutants have been defeated, you have gained enough knowledge of the Ichor and may now face the final boss. REVEAL THE MAP THAT SAYS IT IS FOR THE FINAL BOSS AND UNLOCK SMALL AND LARGE SECRET CARDS F. You are now ready for the final battle!
All rules for the final boss can be found HERE.
SECRETS

This game contains a large and small deck of secret cards as well as a few black bags. When you are instructed to open
a secret, look for the matching bags and set of cards. Not all secrets have both, the back of cards will tell what is included with the set.
READY TO PLAY?
Start with the mutant setup guide HERE. Once you are setup you are ready to play the game.
PUBLISHER
SUBCRIBE FOR UPDATES